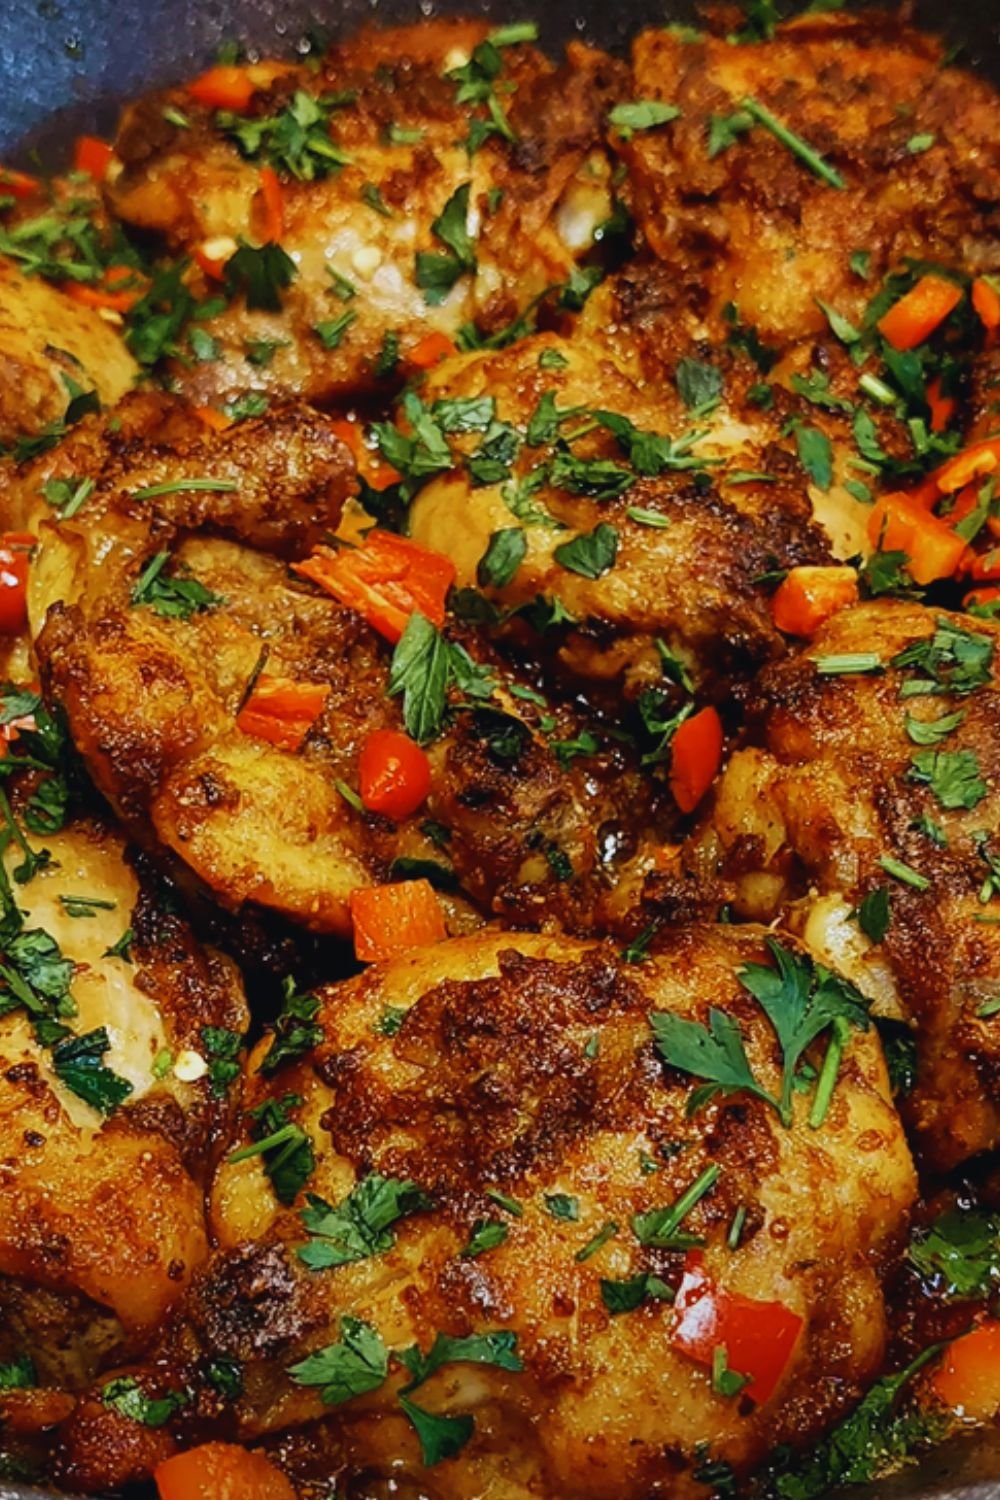
There’s something magical about biting into a perfectly crispy chicken wing. That satisfying crunch giving way to tender, juicy meat is an experience that never gets old. For years, I was convinced that achieving that restaurant-quality crispiness required deep frying – but I couldn’t have been more wrong.
After countless experiments in my kitchen (and yes, some memorable failures), I’ve perfected the art of creating genuinely crispy chicken wings in the oven. No deep fryer needed! These wings rival any you’d get at your favorite sports bar but come with the added benefits of being healthier and far less messy to prepare.
Today, I’m sharing my tried-and-true method for making incredibly crispy baked chicken wings that will have your friends and family questioning if you secretly deep-fried them. Let’s dive into everything you need to know about creating wing perfection in your own oven.
The Science Behind Crispy Baked Wings
Before jumping into the recipe, I think it’s important to understand why this method works so well. The secret to achieving that coveted crispiness without frying comes down to three key factors:
Drying the skin: Moisture is the enemy of crispiness. By thoroughly patting the wings dry and allowing them to air-dry in the refrigerator, we remove excess moisture from the skin surface.
The baking powder trick: Food-grade aluminum-free baking powder (not to be confused with baking soda) works a chemical miracle here. It raises the skin’s pH level, helping to break down proteins and create a crispier texture when baked.
Two-temperature cooking method: Starting with a lower temperature helps render the fat beneath the skin, then finishing at high heat creates that golden, crispy exterior.
This approach has transformed my wing game, and I’m confident it will do the same for yours.
Ingredients You’ll Need
For the wings:
- 4 pounds chicken wings (about 40 pieces, split into flats and drumettes)
- 2 tablespoons aluminum-free baking powder (NOT baking soda)
- ¾ teaspoon kosher salt
- ½ teaspoon freshly ground black pepper
- ½ teaspoon garlic powder
- ½ teaspoon onion powder
- ¼ teaspoon paprika
For the classic buffalo sauce (optional):
- ½ cup unsalted butter
- ⅔ cup hot sauce (Frank’s RedHot is traditional)
- 1 tablespoon honey
- ½ teaspoon garlic powder
For the garlic parmesan sauce (optional):
- 4 tablespoons unsalted butter, melted
- 4 cloves garlic, minced
- ½ cup freshly grated Parmesan cheese
- 1 tablespoon fresh parsley, chopped
- ½ teaspoon black pepper
Essential Equipment
Dl: Wire rack
: A cooling rack that fits inside your baking sheet is crucial. This elevates the wings, allowing hot air to circulate around them completely for even crisping.
Dl: Baking sheet with rim
: Choose a sheet large enough to hold all wings without crowding, with a rim to catch any drippings.
Dl: Paper towels
: For thoroughly drying the wings before seasoning.
Dl: Mixing bowls
: One large bowl for tossing wings with the baking powder mixture.
Dl: Measuring spoons
: For precise measurement of the baking powder and seasonings.
Step-by-Step Instructions
Preparation Phase (Day Before or Morning Of)
- Prep the wings: If your wings haven’t been separated yet, cut them at the joints to separate the drumettes from the flats. Discard the wing tips or save them for making stock.
- Dry thoroughly: Using paper towels, pat the wings completely dry. This step is crucial – don’t skip it!
- Season properly: In a large bowl, mix the baking powder, salt, pepper, garlic powder, onion powder, and paprika. Add the dried wings and toss until every piece is evenly coated.
- Set up for air-drying: Place a wire rack on a baking sheet, then arrange the wings in a single layer on the rack, making sure they don’t touch.
- Air-dry in the refrigerator: Place the baking sheet with the wings uncovered in the refrigerator for at least 8 hours, preferably overnight. If you’re short on time, 4 hours will work, but longer is better.

Baking Day
- Preheat strategically: Position an oven rack in the upper-middle position. Preheat your oven to 250°F (120°C).
- Initial low-temperature bake: Place the wings (still on the rack on the baking sheet) in the preheated oven and bake for 30 minutes. This step helps render the fat under the skin.
- Increase the heat: Without removing the wings from the oven, increase the temperature to 425°F (220°C).
- High-temperature finish: Continue baking for 40-50 minutes, rotating the pan halfway through, until the wings are beautifully golden brown and the skin is crispy.
- Check for doneness: The internal temperature should reach 165°F (74°C) when tested with an instant-read thermometer.
- Rest briefly: Let the wings rest for 5 minutes before tossing with your sauce of choice.
Sauce Preparation (While Wings Are Baking)
For Classic Buffalo Sauce:
- Melt the butter in a small saucepan over medium-low heat.
- Whisk in the hot sauce, honey, and garlic powder until smooth.
- Keep warm until ready to use, or refrigerate and rewarm when wings are done.
For Garlic Parmesan Sauce:
- Combine the melted butter and minced garlic in a bowl.
- Add the Parmesan cheese, parsley, and black pepper, mixing well.
- Set aside at room temperature until wings are ready.
Final Step: Sauce Application
- Place your crispy wings in a large bowl.
- Pour your sauce of choice over the wings.
- Toss gently until every wing is evenly coated.
- Transfer to a serving platter and enjoy immediately.

Nutritional Information
I believe in making informed food choices, so here’s a detailed nutritional breakdown for these baked wings:
| Nutrient | Amount (per 4 wings) |
|---|---|
| Calories | 320 |
| Protein | 28g |
| Total Fat | 22g |
| Saturated Fat | 7g |
| Cholesterol | 105mg |
| Carbohydrates | 1g |
| Fiber | 0g |
| Sugars | 0g |
| Sodium | 480mg |
| Potassium | 220mg |
| Calcium | 30mg |
| Iron | 1.2mg |
Note: Nutritional values are for plain wings without sauce. Buffalo sauce adds approximately 80 calories per serving, while garlic parmesan adds about 110 calories.
Troubleshooting Common Issues
Sometimes things don’t go as planned. Here are solutions to the most common issues when making baked wings:
| Problem | Possible Cause | Solution |
|---|---|---|
| Wings aren’t crispy | Insufficient drying | Make sure to thoroughly pat wings dry and air-dry in refrigerator |
| Oven temperature too low | Verify your oven temperature with an oven thermometer | |
| Overcrowded baking sheet | Ensure wings aren’t touching; use two sheets if necessary | |
| Wings too salty | Too much baking powder | Carefully measure the baking powder – it should be 2 tablespoons for 4 pounds |
| Using baking soda instead | Double-check you’re using baking powder, not baking soda | |
| Skin sticking to rack | Rack not prepared properly | Lightly spray the rack with non-stick cooking spray before arranging wings |
| Wings cooking unevenly | Uneven wing sizes | Try to group similarly sized pieces together; rotate pan during cooking |
| Sauce not sticking | Wings too hot when sauced | Let wings rest 3-5 minutes before applying sauce |
| Sauce too thin | For thicker sauce, reduce it slightly on the stovetop |
Flavor Variations: Beyond Basic Buffalo
While classic buffalo and garlic parmesan are fantastic options, I’ve experimented with numerous flavor profiles. Here are some of my favorite variations:
- Honey Sriracha: Mix ⅓ cup honey, ¼ cup Sriracha, 2 tablespoons soy sauce, 1 tablespoon lime juice, and 1 minced garlic clove.
- Lemon Pepper: Toss wings with 3 tablespoons melted butter, 2 teaspoons lemon zest, 2 tablespoons lemon juice, and 2 teaspoons freshly ground black pepper.
- Korean-Style: Combine ¼ cup gochujang (Korean chili paste), 3 tablespoons honey, 2 tablespoons soy sauce, 1 tablespoon rice vinegar, 1 teaspoon sesame oil, and 1 minced garlic clove.
- Jamaican Jerk: Mix 3 tablespoons jerk seasoning with 2 tablespoons oil, 1 tablespoon lime juice, and 1 tablespoon brown sugar.
- Maple Chipotle: Blend ¼ cup maple syrup, 2 tablespoons adobo sauce from canned chipotles, 1 minced chipotle pepper, 1 tablespoon Dijon mustard, and a pinch of cinnamon.
Make-Ahead and Storage Tips
I often prepare wings for game days or parties, so here are my tested methods for making them ahead of time:
Make-Ahead Options:
- Prep and refrigerate: Follow all prep steps, including coating with baking powder mixture, and air-dry in the refrigerator for up to 24 hours before baking.
- Pre-bake option: Complete the first 30 minutes of low-temperature baking, then cool and refrigerate wings. When ready to serve, continue with the high-temperature baking step (may need an extra 5-10 minutes).
- Sauce preparation: All sauces can be made up to 3 days ahead and stored in airtight containers in the refrigerator. Reheat gently before using.
Storage Guidelines:
- Refrigeration: Store leftover wings in an airtight container for up to 4 days. The skin won’t stay as crispy, but they’ll still taste great.
- Freezing cooked wings: Cool completely, then freeze in a single layer on a baking sheet. Once frozen, transfer to freezer bags and store for up to 3 months.
- Reheating for best results: Thaw frozen wings in the refrigerator overnight. Reheat wings on a wire rack in a 350°F (175°C) oven for 15-20 minutes until heated through and crisp again.
Serving Suggestions

The perfect wing experience isn’t complete without thoughtful accompaniments. Here are my favorite serving suggestions:
- Classic accompaniments: Celery and carrot sticks with blue cheese or ranch dressing
- **Fresh contrastsPineapple chunks or cucumber spears provide refreshing counterpoints to spicy wings
- Cooling sides: Creamy coleslaw or a simple green salad
- Starchy complements: Sweet potato fries or corn on the cob
- Beverage pairings: Sparkling water with lime, lemonade, or iced tea
- For the kids: Apple juice boxes and a simplified honey-butter sauce for milder palates
- Dessert follow-up: Something cool and light like fresh fruit or sorbet balances the meal
Health-Conscious Adaptations
While these baked wings are already healthier than their deep-fried counterparts, here are additional modifications for those with specific dietary concerns:
- Lower sodium: Reduce salt to ½ teaspoon and use a sodium-free seasoning blend
- Gluten-free: Verify your baking powder is gluten-free (most are, but always check)
- Lower fat: Remove skin from wings before baking (note: they won’t be as crispy)
- Paleo-friendly: Skip the baking powder and increase the spices; wings won’t be as crispy but still delicious
- Keto-compatible: These wings are naturally keto-friendly; just watch sugar content in sauces
- Lower carb sauces: Use a hot sauce with no added sugar and replace honey with a sugar-free substitute
Expert Tips From My Kitchen to Yours
After making hundreds of batches of wings, I’ve learned a few tricks that make a significant difference:
- Temperature matters: Wings straight from the refrigerator cook more evenly than room-temperature wings.
- The pat-dry technique: Press firmly but gently when drying wings to remove maximum moisture without tearing the skin.
- Baking powder quality: Always use aluminum-free baking powder to avoid any metallic taste.
- Test for doneness: Wings should reach 165°F (74°C) internally, but I find 175°F (80°C) yields more tender meat that easily pulls from the bone.
- Sauce timing: For maximum crispiness, sauce only the wings you’ll eat immediately. Keep extra wings unsauced until serving.
- Rack cleaning tip: Soak your wire rack in hot, soapy water immediately after use to make cleanup much easier.

Q&A Section
Q: Can I use frozen wings for this recipe?
Absolutely, but with some adjustments. Thaw the wings completely in the refrigerator (never at room temperature), then pat them very thoroughly with paper towels to remove all excess moisture. You might need to replace the paper towels several times. I recommend giving them extra time in the refrigerator uncovered (12+ hours) to ensure proper drying.
Q: Why is my baking powder clumping on the wings?
This typically happens when the wings aren’t dry enough before coating. Make sure to pat the wings completely dry with paper towels. Also, try mixing the baking powder with the other dry seasonings before applying to the wings for more even distribution.
Q: Can I use this method for boneless chicken?
While this specific technique is designed for bone-in wings, you can adapt it for boneless chicken pieces. Reduce the initial baking time at 250°F to 15 minutes, then bake at 425°F for about 15-20 minutes depending on thickness. Use a meat thermometer to verify doneness.
Q: My wings aren’t getting as crispy as I’d like. What am I doing wrong?
Three common culprits: First, check that you’re using baking powder (not baking soda). Second, make sure your oven is properly calibrated – an oven thermometer is invaluable. Third, ensure you’re not overcrowding the baking sheet – air circulation is essential for crispiness.
Q: How do I keep the wings crispy when serving at a party?
Keep them warm in a 200°F oven on a wire rack. For maximum crispiness, don’t sauce them until just before serving. Alternatively, set up a sauce bar and let guests apply their preferred sauce.
Q: What’s the best way to reheat leftover wings while keeping them crispy?
Reheat them on a wire rack in a 350°F oven for 10-15 minutes. Avoid the microwave, which will make them soggy. If you’re in a hurry, a toaster oven works well for small batches.
Q: Can I double or triple this recipe for a large gathering?
Yes, but don’t crowd the wings on the baking sheets. Use multiple racks and rotate them during cooking. You may need to extend the cooking time slightly. For very large batches, cook in stages and hold finished wings in a 200°F oven.
Q: Is there a way to make these wings in an air fryer?
Absolutely! Prepare them with the same baking powder method, then air fry at 380°F for about 25 minutes, turning halfway through. Finish with 5 minutes at 400°F for extra crispiness. Work in batches for best results.
A Final Word on Wing Perfection
I’ve spent years perfecting this technique because I believe everyone deserves to enjoy restaurant-quality wings at home without the mess and expense of deep frying. These baked wings might take a bit more time than throwing wings in hot oil, but the results are well worth it – healthier, just as crispy, and deeply flavorful.
The key to success lies in patience: properly drying the wings, allowing them to air-dry in the refrigerator, and the two-temperature baking process. Follow these steps, and I promise you’ll never go back to fried wings again.
Whether you’re hosting a game day gathering, planning a casual family dinner, or simply treating yourself to some comfort food, these crispy baked wings deliver restaurant quality results every time. So turn on your oven, grab some wings, and get ready to impress everyone – including yourself!